VScode C/C++ 环境配置教程 (GCC)

简洁版

  • 安装 MSYS2
  • 在 MSYS2 里面 pacman -S mingw-w64-x86_64-toolchain 安装 MinGW-64
  • MinGW 环境变量配置(可选项)
  • VScode 安装 C/C++ Extension Pack
  • 在源代码文件夹的 .vscode 文件夹中配置 tasks.jsonlaunch.json

编译器安装

对于 Windows 下的 GCC 安装目前有多种解决方案,如 MinGW项目,MinGW-64 项目,Cygwin 项目, MSYS2 项目等,其中 MSYS2 是一个较为活跃的项目,他提供了一个 Linux Like shell 环境,以及 Pacman 包管理系统,因此在使用管理上更为科学。在后续使用中,我们也将通过 MSYS2 的包管理器来安装 MinGW-64,而 MinGW-64 中包含了 GCC。

MSYS2 安装

MSYS2 下载安装包,当前版本为 msys2-x86_64-20220319.exe,下载之后直接打开进行安装

一路上基本不需要进行配置,按照软件指示的进行下一步即可

需要注意一下的只有软件的安装路径,后续我们配置命令行的环境变量需要用到

默认的安装位置为 C:\msys64

image-20220410203104485

这一步需要耐心等待好几分钟

image-20220411153915732

安装完后立即运行即可

image-20220411153959633

打开之后是这样的一个 Shell 环境(打码处是你的用户名@主机名)

image-20220410204742294

MSYS2 镜像配置

MSYS2 安装软件时是从 Pacman 包管理器的库中下载的,它的原始服务器在国外,因此我们需要为包管理器切换到国内的库镜像源

这里我们选择清华源,清华 MSYS2 源 的说明如下:

编辑 /etc/pacman.d/mirrorlist.mingw32 ,在文件开头添加:

1
Server = https://mirrors.tuna.tsinghua.edu.cn/msys2/mingw/i686

编辑 /etc/pacman.d/mirrorlist.mingw64 ,在文件开头添加:

1
Server = https://mirrors.tuna.tsinghua.edu.cn/msys2/mingw/x86_64

编辑 /etc/pacman.d/mirrorlist.ucrt64 ,在文件开头添加:

1
Server = https://mirrors.tuna.tsinghua.edu.cn/msys2/mingw/ucrt64

编辑 /etc/pacman.d/mirrorlist.clang64 ,在文件开头添加:

1
Server = https://mirrors.tuna.tsinghua.edu.cn/msys2/mingw/clang64

编辑 /etc/pacman.d/mirrorlist.msys ,在文件开头添加:

1
Server = https://mirrors.tuna.tsinghua.edu.cn/msys2/msys/$arch

然后执行 pacman -Sy 刷新软件包数据即可。

注: 本Help参考自USTC镜像

我们只需要安装 MinGW-64 相关库、包,因此这里我们只需配置 MinGW-64 的镜像文件,读者有需求的后续自行配置即可

配置步骤:

注,这部分的命令行均在 MSYS2 中运行

  • 先对原文件进行备份,良好的使用习惯
1
cp /etc/pacman.d/mirrorlist.mingw64 /etc/pacman.d/mirrorlist.mingw64.bkp
  • 编辑配置文件
1
sed -i '1iServer = https://mirrors.tuna.tsinghua.edu.cn/msys2/mingw/x86_64' /etc/pacman.d/mirrorlist.mingw64
  • 查看编辑结果
1
cat /etc/pacman.d/mirrorlist.mingw64 

上一步查看的输出如下,可以看到清华源的已经成功添加到配置文件的第一行中

1
2
3
4
5
6
7
8
9
10
11
12
13
14
15
16
17
18
19
20
21
22
23
24
25
26
27
28
29
30
31
32
33
34
35
36
37
38
39
Server = https://mirrors.tuna.tsinghua.edu.cn/msys2/mingw/x86_64
See https://www.msys2.org/dev/mirrors

# Primary
Server = https://mirror.msys2.org/mingw/x86_64/
Server = https://repo.msys2.org/mingw/x86_64/

# Tier 1
Server = https://mirror.umd.edu/msys2/mingw/x86_64/
Server = https://mirror.yandex.ru/mirrors/msys2/mingw/x86_64/
Server = https://download.nus.edu.sg/mirror/msys2/mingw/x86_64/
Server = https://ftp.acc.umu.se/mirror/msys2.org/mingw/x86_64/
Server = https://ftp.nluug.nl/pub/os/windows/msys2/builds/mingw/x86_64/
Server = https://ftp.osuosl.org/pub/msys2/mingw/x86_64/
Server = https://mirror.internet.asn.au/pub/msys2/mingw/x86_64/
Server = https://mirror.selfnet.de/msys2/mingw/x86_64/
Server = https://mirror.ufro.cl/msys2/mingw/x86_64/
Server = https://mirrors.dotsrc.org/msys2/mingw/x86_64/
Server = https://mirrors.bfsu.edu.cn/msys2/mingw/x86_64/
Server = https://mirrors.tuna.tsinghua.edu.cn/msys2/mingw/x86_64/
Server = https://mirrors.ustc.edu.cn/msys2/mingw/x86_64/
Server = https://mirror.nju.edu.cn/msys2/mingw/x86_64/
Server = https://repo.extreme-ix.org/msys2/mingw/x86_64/
Server = https://mirrors.hit.edu.cn/msys2/mingw/x86_64/

# Tier 2
Server = https://mirror.clarkson.edu/msys2/mingw/x86_64/
Server = https://fastmirror.pp.ua/msys2/mingw/x86_64/
Server = https://ftp.cc.uoc.gr/mirrors/msys2/mingw/x86_64/
Server = https://mirror.jmu.edu/pub/msys2/mingw/x86_64/
Server = https://mirrors.piconets.webwerks.in/msys2-mirror/mingw/x86_64/
Server = https://quantum-mirror.hu/mirrors/pub/msys2/mingw/x86_64/
Server = https://www2.futureware.at/~nickoe/msys2-mirror/mingw/x86_64/
Server = https://mirrors.sjtug.sjtu.edu.cn/msys2/mingw/x86_64/
Server = https://mirrors.bit.edu.cn/msys2/mingw/x86_64/
Server = https://repo.casualgamer.ca/mingw/x86_64/
Server = https://mirrors.aliyun.com/msys2/mingw/x86_64/
Server = https://mirror.iscas.ac.cn/msys2/mingw/x86_64/

image-20220412000810795
  • 刷新包管理器缓存
1
pacman -Sy 

安装 MinGW-64 工具链(GCC)

Mingw-w64 includes a port of the GNU Compiler Collection (GCC), GNU Binutils for Windows (assembler, linker, archive manager), a set of freely distributable Windows specific header files and static import libraries which enable the use of the Windows API, a Windows native build of the GNU Project‘s GNU Debugger, and miscellaneous utilities.

来源:维基百科

Mingw-w64包括GNU Compiler Collection (GCC)的端口,GNU Binutils Windows(汇编器、连接器、归档管理器),一组发布的Windows特定头文件和静态导入库启用Windows API的使用,一个Windows本地构建GNU项目的GNU调试器,和各种各样的实用程序。

简单来说,MinGW-w64 提供了包括 GCC 编译器在内的一系列 GNU 工具,在 Windows 上提供 GNU 支持

注:以下命令依旧在 MSYS2 中运行

  • 安装 MinGW-64
1
pacman -S mingw-w64-x86_64-toolchain

默认会安装以下一系列包,连续回车确认即可

image-20220410211355858

下载中 ,可以看到配置清华源之后下载速度还是很快的

image-20220410211440566

安装中,需要耐心等待几分钟

image-20220410211814797

安装完毕后,之前我们的 MSYS2 默认是安装在 C:\msys64 ,因此对应的 MinGW64 在 C:\msys64\mingw64

此时我们的 C:\msys64\mingw64\bin 路径下应该出现了很多的 *.exe ,其中就包括

  • gcc.exe
  • g++.exe
  • gdb.exe

这三个可执行文件向用户提供了主要的编译、Debug功能支持,其中 gcc.exe 是整个gcc 的入口,它也可以编译 .cpp ,但为了避免不必要的麻烦,我们还是显式使用 g++.exe

GCC 环境变量配置(可选、建议)

在通过 VScode 使用 GCC 时,编译器路径都配置在 .vscode 里面的配置文件里面,因此环境变量并不是必须的

但有时我们也需要通过终端手动进行编译,因此笔者建议还是配置一下环境变量

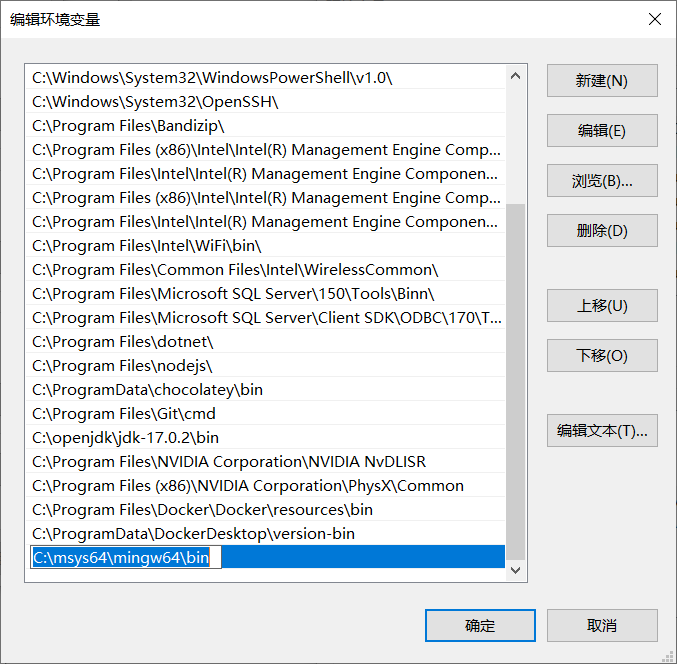
在系统变量的 Path 中添加 C:\msys64\mingw64\bin ,这能让我们在 cmdpowershell 中直接使用 g++ xxx.cpp 等命令

配置过程如下:

Win + S 搜索 编辑系统环境变量
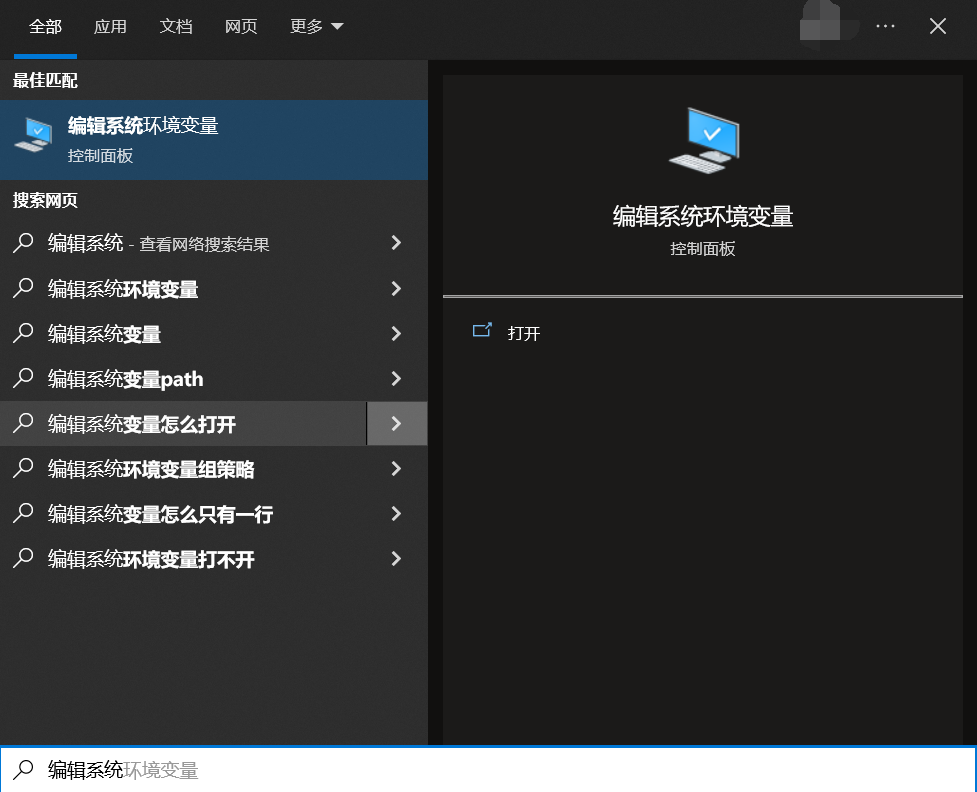
image-20220410213459135

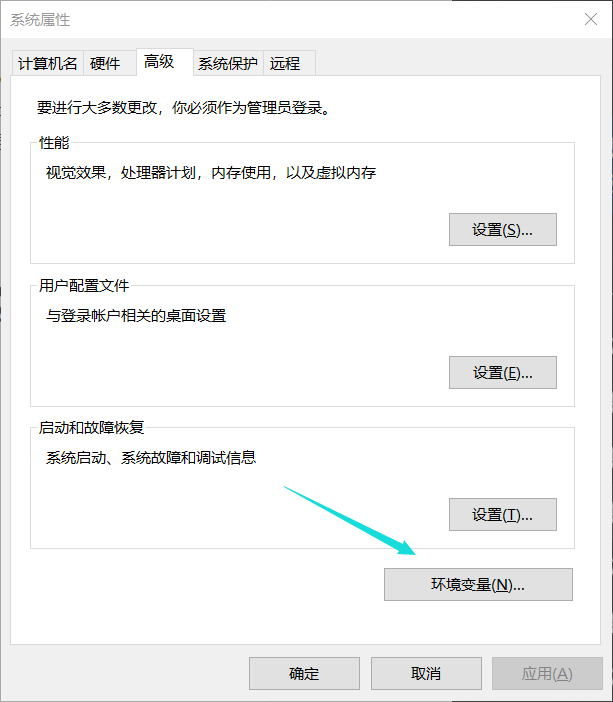
选择 环境变量

image-20220410213540687

选择中编辑 系统变量 中的 Path

image-20220410213702090

新建一个行后输入 C:\msys64\mingw64\bin

image-20220410214035122

然后 确定 -> 确定 -> 确定 关闭窗口

此时打开一个新的 cmd 或者 powershell 终端(重新打开的终端里面或者电脑重启之后环境变量才会生效)

  • 运行测试命令
1
gcc -v

如果配置成功的话此时会有如下输出,说明此时 gcc 已经在我们的电脑里配置好了

1
2
3
4
5
6
7
8
Using built-in specs.
COLLECT_GCC=C:\msys64\mingw64\bin\gcc.exe
COLLECT_LTO_WRAPPER=C:/msys64/mingw64/bin/../lib/gcc/x86_64-w64-mingw32/11.2.0/lto-wrapper.exe
Target: x86_64-w64-mingw32
Configured with: ../gcc-11.2.0/configure --prefix=/mingw64 --with-local-prefix=/mingw64/local --build=x86_64-w64-mingw32 --host=x86_64-w64-mingw32 --target=x86_64-w64-mingw32 --with-native-system-header-dir=/mingw64/include --libexecdir=/mingw64/lib --enable-bootstrap --enable-checking=release --with-arch=x86-64 --with-tune=generic --enable-languages=c,lto,c++,fortran,ada,objc,obj-c++,jit --enable-shared --enable-static --enable-libatomic --enable-threads=posix --enable-graphite --enable-fully-dynamic-string --enable-libstdcxx-filesystem-ts --enable-libstdcxx-time --disable-libstdcxx-pch --disable-libstdcxx-debug --enable-lto --enable-libgomp --disable-multilib --disable-rpath --disable-win32-registry --disable-nls --disable-werror --disable-symvers --with-libiconv --with-system-zlib --with-gmp=/mingw64 --with-mpfr=/mingw64 --with-mpc=/mingw64 --with-isl=/mingw64 --with-pkgversion='Rev10, Built by MSYS2 project' --with-bugurl=https://github.com/msys2/MINGW-packages/issues --with-gnu-as --with-gnu-ld --with-boot-ldflags='-pipe -Wl,--disable-dynamicbase -static-libstdc++ -static-libgcc' LDFLAGS_FOR_TARGET=-pipe --enable-linker-plugin-flags='LDFLAGS=-static-libstdc++\ -static-libgcc\ -pipe\ -Wl,--stack,12582912'
Thread model: posix
Supported LTO compression algorithms: zlib zstd
gcc version 11.2.0 (Rev10, Built by MSYS2 project)

VScode 配置

新建一个文件夹用来写代码

在 VScode 中打开这个文件夹

这里我们用 C:\cpp_test 文件夹来做演示

安装 C/C++ 插件

打开 VScode 后 安装 C/C++ Extension Pack 插件,里面主要包含了 C/C++ 用来做编辑器中 C++ 的语法高亮提示、补全和包括 Cmake 和一些其它开发工具,对于新手来说笔者觉得不需要太早接触 Cmake,简单进行一些熟悉练习之后再转向 Cmake 即可

image-20220410215205922

通过插件自动配置,直接运行

新建一个用于测试的源文件 test.cpp

源文件内容如下

1
2
3
4
5
6
7
include <iostream>

int main()
{
std::cout << "Hello World!" << std::endl;
return 0;
}

此时我们可以看到, VScode 右上角提供了 DebugRunRun File 三个选项,可以看到 C/C++ 插件已经提供了比较良好的支持

如果之前的 MinGW 已经配置好了的话,这里我们应该已经可以直接通过这三个选项来 DebugRun 了,不必要进行额外配置

Run Code

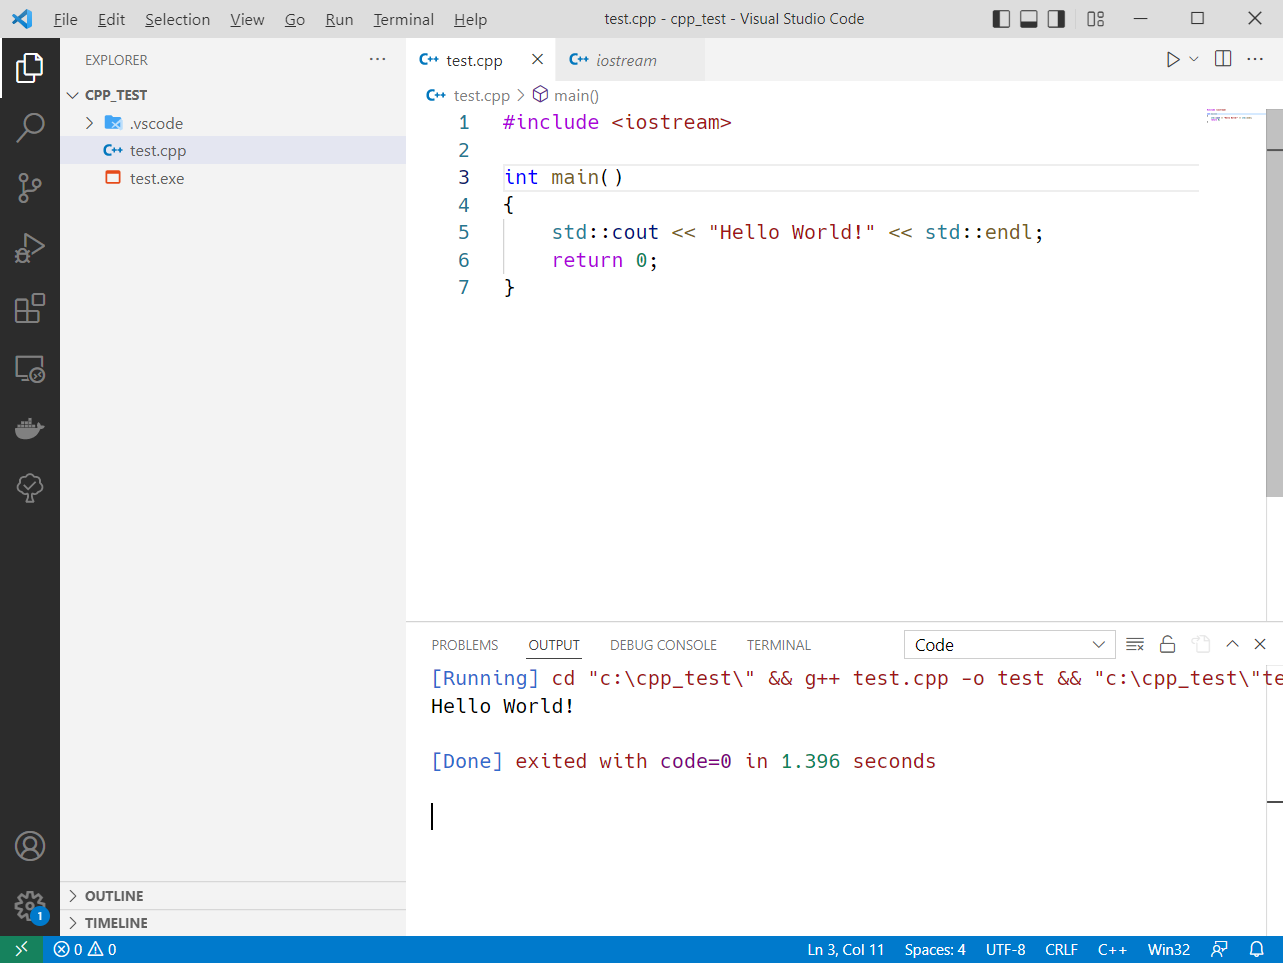
直接选择 Run Code

image-20220410220357867

输出结果如下

image-20220410220439837

可以看到,VScode 调用了 g++ 命令来编译我们的 test.cpp 源代码,并输出 test.exe,然后运行了 test.exe

1
cd "c:\cpp_test\" && g++ test.cpp -o test && "c:\cpp_test\"test

运行输出结果

1
Hello World!

Debug C/C++ File

当我们选择 Debug

image-20220410220840817

会弹窗让我们配置文件,三个选项分别用于生成 g++.execpp.execl.exe 对应的配置模板

前两项都对应 gcc ,而 cl.exe 则是微软的编译器,这里我们选择g++.exe
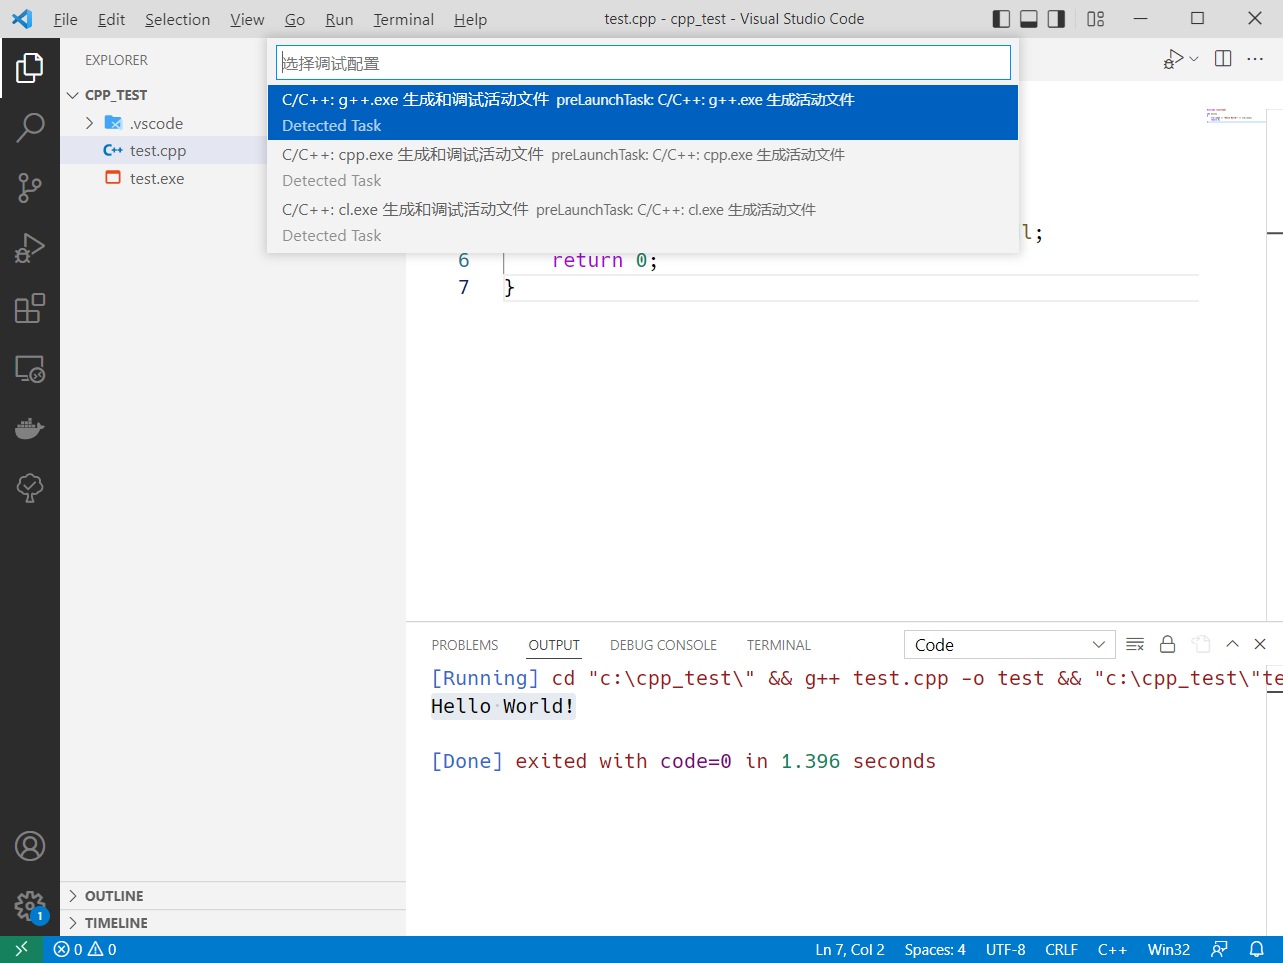
image-20220410220941930

选中 VScode 就会自动在当前目录的 .vscode 目录下的 task.json 新生成用于 Debug 的一个 task,生成之后就会自动继续 Debug,也就是运行这个 task,运行结果应该如下图
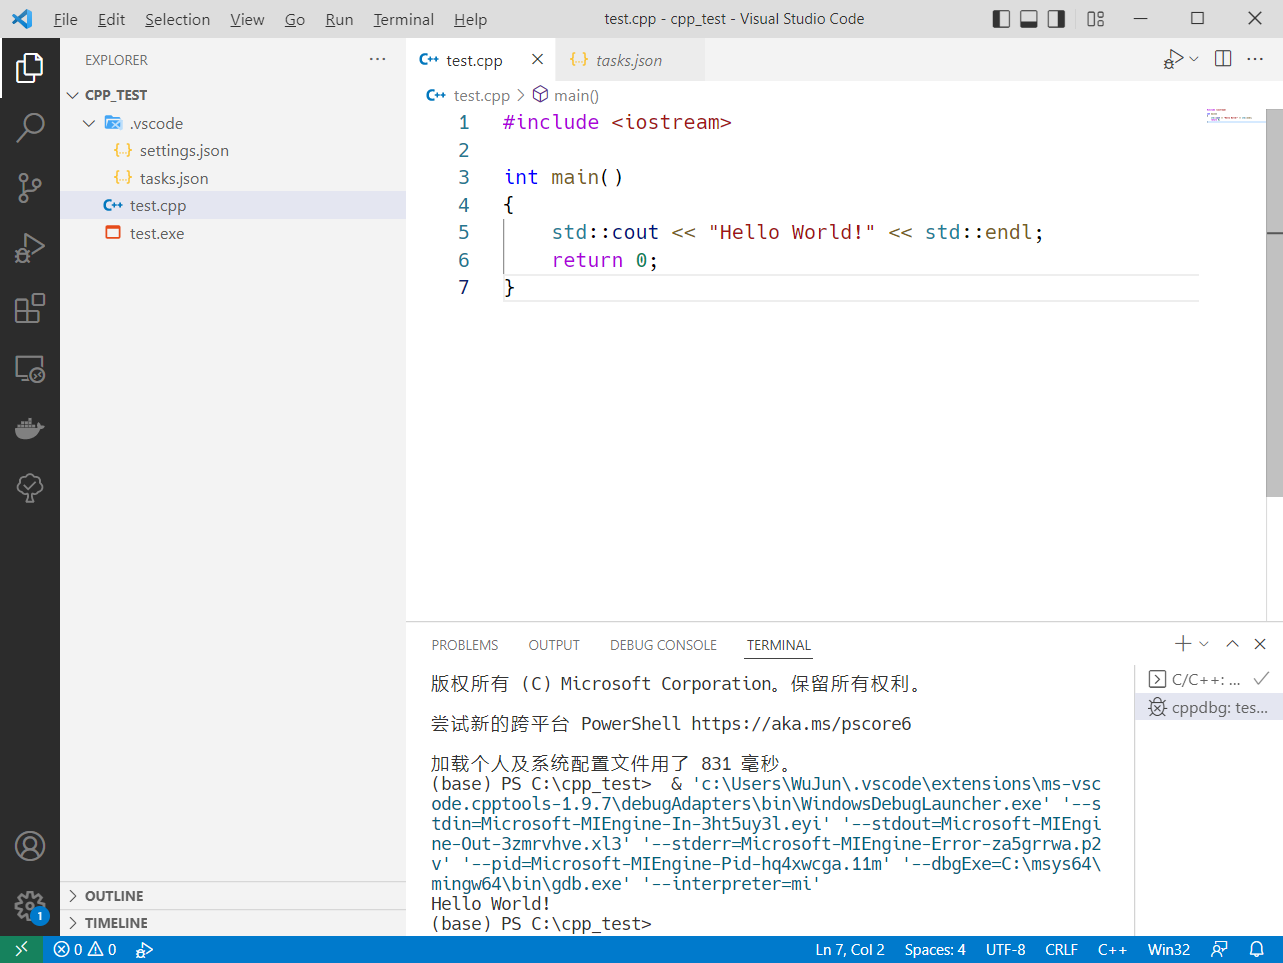
image-20220410221813341

我们可以看到有两个 TERMINAL

其中第一个 terminal 是 task 执行的输出结果

image-20220410222046874

我们可以打开 .vscode/tasks.json 查看这个 task 的配置

image-20220410222149994

可以看到这个 task C/C++: g++.exe 生成活动文件 用于编译带 debug 信息的可执行文件 test.exe

配置的具体内容如下

1
2
3
4
5
6
7
8
9
10
11
12
13
14
15
16
17
18
19
20
21
22
23
24
25
26
27
28
{
"tasks": [
{
"type": "cppbuild",
"label": "C/C++: g++.exe 生成活动文件",
"command": "C:\\msys64\\mingw64\\bin\\g++.exe",
"args": [
"-fdiagnostics-color=always",
"-g",
"${file}",
"-o",
"${fileDirname}\\${fileBasenameNoExtension}.exe"
],
"options": {
"cwd": "${fileDirname}"
},
"problemMatcher": [
"$gcc"
],
"group": {
"kind": "build",
"isDefault": true
},
"detail": "调试器生成的任务。"
}
],
"version": "2.0.0"
}

第二个 terminal 则是通过 gdb.exe 来让 VScode 对 test.exe 进行 debug,运行结果如下

image-20220410222434078

由于我们并没有打断点,因此预期的结果应该是程序顺利运行输出结果 Hello World! 并结束运行

第二个 terminal 部分的功能配置本来应该是在 .vscode/launch.json 中配置,笔者猜测这里是集成在了 C/C++ 插件中,减轻了使用者的配置负担

添加个变量用于观察 int a = 1;

我们在第7行打个断点再进行 Debug 试试

image-20220410223810709

此时 VScode 会自动跳转到 Debug 界面,可以看到局部变量等信息都在右侧栏,关于 Debug 的更多使用这里就不再进一步探讨

Run C/C++ File
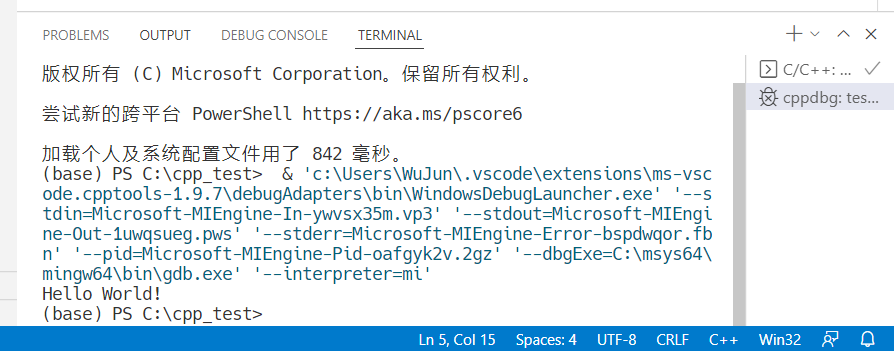
image-20220410230821399

当我们选择 Run C/C++ File 时可以看到和没打断点之前的输出结果差不多,而手动打断点之后 Run C/C++ File 也不会

也就是是 Run C/C++ File 应该就是 Run Without Debugging

手动配置(可选)

注:通过插件自动配置和手动配置中选一个就可以了(也可以都进行配置,它们并不冲突

这里再提供手动配置来配置 Debug 配置的简单说明(对这部分有兴趣的人俺相信你可以自行探索细节

和自动配置一样,新建一个文件夹用来写代码

在 VScode 中打开这个文件夹

这里我们用 C:\cpp_test 文件夹来做演示

新建一个用来演示的源代码 test.cpp

image-20220411180643412

编译配置

从 VScode 的顶栏菜单中选中 Terminal > Configure Default Build Task

从弹出的选项中选择 g++.exe 生成活动文件

image-20220411182523219

然后 VScode 就会自动在当前文件夹创建 .vscode.vscode\tasks.json

其中,tasks.json 如下

1
2
3
4
5
6
7
8
9
10
11
12
13
14
15
16
17
18
19
20
21
22
23
24
25
26
27
28
{
"version": "2.0.0",
"tasks": [
{
"type": "cppbuild",
"label": "C/C++: g++.exe 生成活动文件",
"command": "C:\\msys64\\mingw64\\bin\\g++.exe",
"args": [
"-fdiagnostics-color=always",
"-g",
"${file}",
"-o",
"${fileDirname}\\${fileBasenameNoExtension}.exe"
],
"options": {
"cwd": "${fileDirname}"
},
"problemMatcher": [
"$gcc"
],
"group": {
"kind": "build",
"isDefault": true
},
"detail": "编译器: C:\\msys64\\mingw64\\bin\\g++.exe"
}
]
}

当配置生成之后我们就可以通过 Terminal > Configure Default Build Task 来进行编译,编译输出如下

image-20220411184107897

可以看到 test.exe 已经生成

  • 接下来就可以在 VScode 集成的终端中运行 test.exe
1
./test.exe
image-20220411184254889

Debug 配置

从 VScode 的顶栏菜单中选中 Run > Add Configuration

从弹出的选项中选择 C++ (GDB/LLDB)

image-20220411211042654

按官方文档 Get Started with C++ and Mingw-w64 in Visual Studio Code,在选择 C++ (GDB/LLDB) 后这里应该会跳出模板让我们选择然后自动生成,但俺在实践的时候发现并没有,那就手动配置吧

最开始你的 launch.json 应该看起来是这样的
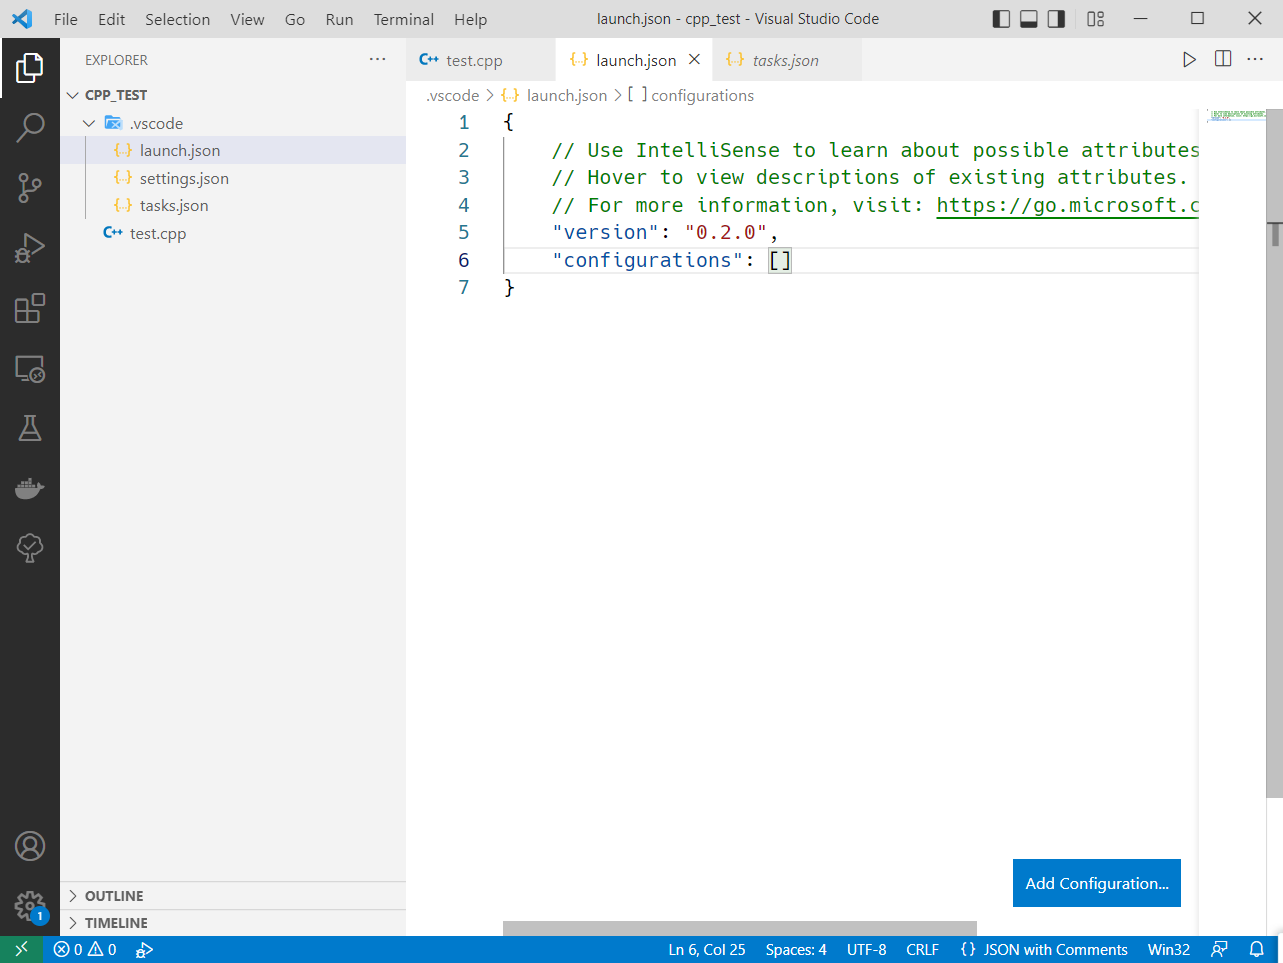
image-20220411215005855

点击右下角 Add Configurations,选择 (gdb) 启动

image-20220411221441617

现在你的 launch.json 应该是这样的

1
2
3
4
5
6
7
8
9
10
11
12
13
14
15
16
17
18
19
20
21
22
23
24
25
26
27
28
29
30
31
32
33
{
// Use IntelliSense to learn about possible attributes.
// Hover to view descriptions of existing attributes.
// For more information, visit: https://go.microsoft.com/fwlink/?linkid=830387
"version": "0.2.0",
"configurations": [
{
"name": "(gdb) 启动",
"type": "cppdbg",
"request": "launch",
"program": "输入程序名称,例如 ${workspaceFolder}/a.exe",
"args": [],
"stopAtEntry": false,
"cwd": "${fileDirname}",
"environment": [],
"externalConsole": false,
"MIMode": "gdb",
"miDebuggerPath": "/path/to/gdb",
"setupCommands": [
{
"description": "为 gdb 启用整齐打印",
"text": "-enable-pretty-printing",
"ignoreFailures": true
},
{
"description": "将反汇编风格设置为 Intel",
"text": "-gdb-set disassembly-flavor intel",
"ignoreFailures": true
}
]
}
]
}

这里我们需要修改的有

  • "program" 修改到与 tasks.json 中的 args 匹配,如果你用的是默认配置的话那就应该是 "${fileDirname}\\${fileBasenameNoExtension}.exe"
  • "miDebuggerPath" 修改到和你的 gdb.exe 全局路径匹配,如果你的 MSYS2 和 MinGW64都是采用默认安装路径的话那就应该是C:\\msys64\\mingw64\\bin\\gdb.exe
  • 添加 "preLaunchTask" 项来在每次 Debug 前重新编译,这里应该和 tasks.json 里面匹配,如果你用的是默认配置的话那就应该是 C/C++: g++.exe 生成活动文件

修改完后你的 launch.json 应该是这样的(这部分应该可以直接复制)

1
2
3
4
5
6
7
8
9
10
11
12
13
14
15
16
17
18
19
20
21
22
23
24
25
26
27
28
29
30
31
32
33
34
{
// Use IntelliSense to learn about possible attributes.
// Hover to view descriptions of existing attributes.
// For more information, visit: https://go.microsoft.com/fwlink/?linkid=830387
"version": "0.2.0",
"configurations": [
{
"name": "(gdb) 启动",
"type": "cppdbg",
"request": "launch",
"program": "${fileDirname}\\${fileBasenameNoExtension}.exe",
"args": [],
"stopAtEntry": false,
"cwd": "${fileDirname}",
"environment": [],
"externalConsole": false,
"MIMode": "gdb",
"miDebuggerPath": "C:\\msys64\\mingw64\\bin\\gdb.exe",
"setupCommands": [
{
"description": "为 gdb 启用整齐打印",
"text": "-enable-pretty-printing",
"ignoreFailures": true
},
{
"description": "将反汇编风格设置为 Intel",
"text": "-gdb-set disassembly-flavor intel",
"ignoreFailures": true
}
],
"preLaunchTask": "C/C++: g++.exe 生成活动文件"
}
]
}

配置完成后就可以通过顶栏菜单 Run > Start Debugging 来进行 Debug 了

image-20220411234713585

总结

本文更多是对官方文档的 Get Started with C++ and Mingw-w64 in Visual Studio Code 实践、翻译、补充,惭愧,建议有兴趣的读者可以去读一下原文档

画饼

后续可能出一篇 VScode + MSVC(VisualStudio C++)的文章

参考文献

[1] Get Started with C++ and Mingw-w64 in Visual Studio Code